|
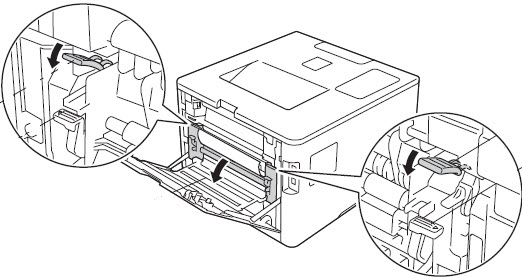
If the printed pages wrinkle or crease, follow the steps below. 1. Open the back cover. NOTE: After you have just used the machine, some internal parts of the machine will be extremely hot. Wait for the machine to cool down before you touch the internal parts of the machine. 2. Pull the blue tabs at the left and right sides toward you and fold down the fuser cover.
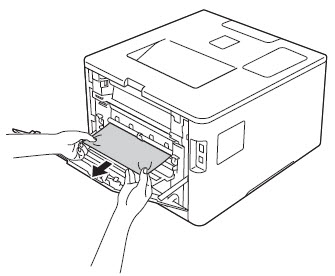
NOTE: If the envelope levers inside the back cover are pulled down to the envelope position. Lift these levers to the original position before pulling the blue tabs down. 3. Look into the machine to locate the two fuser rollers. Once you see the orange roller look above it to locate the black roller. The black roller should have smooth even black coating. Check in between the two fuser rollers and see if you see any damage to the rollers or if there is any paper stuck. If you find a paper stuck, very carefully remove it. When removing stuck paper from in between fuser rollers be careful as the area or the rollers might be extremely hot if the machine has just been recently used. - If the fuser rollers appear damaged, go to step 10. - If the fuser rollers are not damaged, continue to next step.
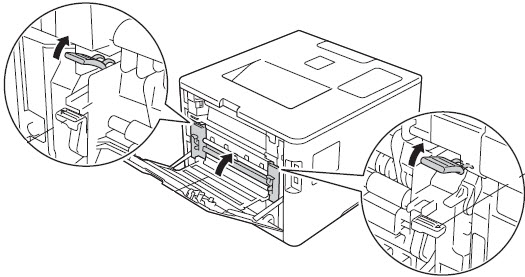
4. Close the fuser cover.
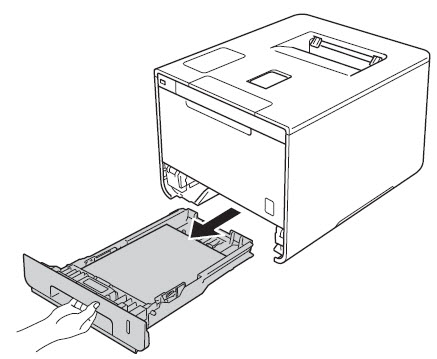
NOTE: If you print on envelopes, pull down the envelope levers (2) to the envelope position again before closing the back cover. 5. Print the document you were printing. If problem continues, continue to next step. 6. Check that paper is loaded into the paper tray correctly. a. Pull the paper tray completely out of the machine and remove the paper from the paper tray.
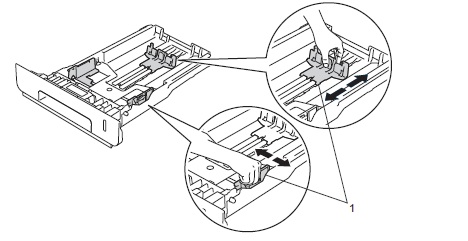
b. While pressing the blue paper-guide release lever in the back of the paper tray, slide the paper guide to fit the paper size. Adjust both the right and rear paper guides. Make sure that the guides are firmly in the slots. Make sure the paper guides touch the sides of the paper so it will feed properly.
c. Put paper in the paper tray. The side to be printed on must be face down. Make sure that the paper is flat in the tray and below the maximum paper mark. The maximum paper mark is located on the right paper guide and marked with 3 red down arrows. d. If the machine is used infrequently, turn over the stack of paper in the paper tray. Also, try rotating the paper 180 degrees in the paper tray. NOTE: The tray can hold up to 250 sheets of 20 lb paper. Paper with a weight of 16 to 28 lbs can be used in the tray. Paper from 29 to 43 lbs, labels, and envelopes should be loaded in the MP Tray. e. Put the paper tray firmly back into the machine. 7. Check that the paper used meets the Media Type setting in the printer driver. 8. Try using new paper from a fresh ream. 9. Check the paper used meets Brother's recommended paper specifications. Recommended Paper Plain Paper: Xerox 4200 20lb or Hammer mill Laser Print 24 lb (90g/m2) Recycled Paper: No specific brand recommended Labels: Avery Laser Labels white #5160 Envelope: No specific brand recommended Glossy Paper: NewPage Future Laser Gloss 80 lb (118 g/m2) or Xerox Digital color Elite Gloss *The machine supports paper up to 43 lb bond paper. Some glossy papers that are 80 lb may be 'TAG' Transformation Paper Type which is equivalent to 38 lb bond paper. Media Type and Capacity by Tray Plain Paper (20 to 28 lb. or 75g/m2 to 105g/m2): Can be printed from Tray 1, Tray 2, Multi-purpose Tray or Duplex Recycled Paper: Can be printed from Tray 1, Manual Feed Slot, or Duplex Bond Paper (16 to 43 lb. or 60g/m2 to 163g/m2): Multi-purpose Tray Thin Paper (16 to 20 lb. or 60g/m2 to 75g/m2): Can be printed from Tray 1, Tray 2, Multi-purpose Tray or Duplex Thick Paper (28 to 43 lb. or 105g/m2 to 163g/m2): Multi-purpose Tray Labels: Multi-purpose Tray Only Envelopes: Multi-purpose Tray Only Glossy Paper (16 to 43 lb. or 60g/m2 to 163g/m2): Multi-purpose Tray Only, Duplex* * Only print in Duplex if Glossy paper is between 16 lb. to 28 lb. The paper cannot be damaged. Damage includes, but is not limited to tears, creases and holes. This includes paper with pre-punched holes for binding. NOTE: if you use paper other than the ones recommended, the paper could jam, misfeed, wrinkle, or crease. 10. If the problem continues, Check the warranty status of your machine by clicking on the Machine Warranty Calculator. If in warranty, contact Brother Customer Support or locate a Brother Authorized Service Center to schedule product replacement or repair. If out of warranty, locate a Brother Authorized Service Center. Repair fees might apply for out-of-warranty products. (责任编辑:) |